Clear Aligners: Alternative to Conventional Orthodontic Systems
20 March 2025Applied Cybersecurity for Dental Practices
15 December 2025
The Operating Microscope in Dentistry
Introduction: The Operating Microscope
Optical aids such as the operating microscope have become indispensable in dental practice. These visual aids are primarily of two types: binocular loupes with a headlamp and the operating microscope.
The operating microscope is, in fact, a direct evolution of binocular loupes, which have already won over numerous practitioners.
Its use in dentistry dates back to the late 1960s in France.
In 1998, its use was mandated in postgraduate programs by the American Association of Endodontics (AAE).
Today, the benefits of the operating microscope in dentistry, particularly in both surgical and non-surgical endodontics, are no longer in question.
Description
The operating microscope consists of four main parts:
- Binoculars
- A tube
- An objective lens
- Coaxial lighting
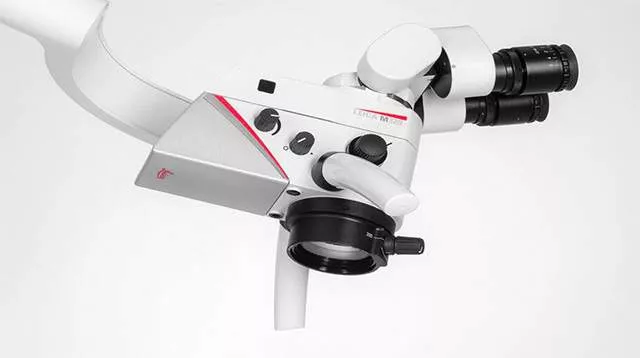
(Figure 1 / Leica brand operating microscope)
Operating Microscope Specifications
Like any medical equipment, the operating microscope must meet a set of requirements:
-Magnification of the operative field from x4 to x21, with a depth of field ranging from 65 mm to 10 mm
-Working distance of 200 to 300 mm
-Binocular, stereoscopic vision
-A light source focused at the center of the operative field
Light intensity 2 to 3 times greater than that of the lighting used with loupes
Advantages and Benefits
The operating microscope offers numerous advantages for the practitioner, the dental assistant, and the patient:
Improved Visibility Thanks to High Magnification
“Seeing better means working better,” especially in micro-dentistry. With the operating microscope, examinations become significantly more precise starting at approximately x13 magnification.
Thanks to its high-quality optics, the microscope allows better diagnosis and provides more information on the carious potential of dental surfaces. It aids in detecting (and thus treating) cracks.
Material placement is optimized by checking for the absence of gaps and eliminating air bubbles in sealants.
In endodontics—where procedures are carried out on the millimeter scale and at depths of 10 to 30 mm within the canal space—visual acuity is the key factor for refining fine motor skills.
Using the microscope thus reduces practitioner stress during endodontic treatments and alleviates the complexity of canal anatomy; the canal system appears clearer and more accessible.
High Image Quality
Flawless image quality ensures a better diagnostic interpretation and makes it possible to achieve highly aesthetic restorations that mimic natural teeth, thanks to the perfect visualization of the color nuances in adjacent teeth.
Tissue Preservation
Visualizing the details of dental tissues allows for more precise removal of carious tissue (often using very fine burs), preserving tooth structure and the surrounding tissues, and making treatments considerably less invasive. This approach strengthens the remaining hard tissues, minimizing the risk of fracture.
Ergonomics
Thanks to its maneuverability, the operating microscope allows for more ergonomic work. It improves the practitioner’s posture and reduces spinal strain and eye fatigue associated with non-ergonomic working positions. This, in turn, significantly lowers the risk of neuromuscular issues stemming from long treatment sessions, as well as the stress that accompanies highly precise procedures.
Improved Daily Practice and Enhanced Quality and Precision of Work
Using an operating microscope when placing adhesive restorations improves the quality of the restoration margins and the seal of the fillings, thereby preventing postoperative sensitivity and recurrent decay. The restorations also benefit from improved polish and enhanced aesthetics.
Additionally, endodontic treatments have traditionally relied on radiographic interpretation, tactile sense, and a mental three-dimensional representation of root canal anatomy. The operating microscope offers direct visual access to much of this anatomy.
Because endodontics is considered a micro-dentistry specialty, the microscope’s magnification helps the practitioner see finer details and perform more precise maneuvers.
Ability to Attach a Camera or a Photographic Device
The option to connect a camera or a photo device simplifies communication with colleagues and serves as an educational tool, creating an interactive environment in which the assistant and patient are more involved in the treatment process.
This setup also allows data archiving, which may be of medico-legal value.
Enhancing the Practice’s Image
Using an operating microscope showcases cutting-edge technology and highlights the value of four-handed teamwork, thus boosting the public image of the dental office.
Research and Studies
In university centers and continuing education courses, the microscope can also become a valuable learning tool, aiding in training and academic research.
Disadvantages and Limitations of the Operating Microscope
Despite its many benefits, the operating microscope does come with certain drawbacks:
Patient Position
To work under optimal conditions, the practitioner may sometimes need to position the patient’s head in a potentially uncomfortable manner, particularly during lengthy sessions.
Learning Curve
Using a microscope in dentistry requires specific training. Moreover, an adaptation period is necessary—ranging from 3 to 6 months for those accustomed to using binocular loupes, and up to 12 months for others. Additionally, the practitioner must learn to work almost exclusively with indirect vision.
Practitioner’s Position
To work effectively and comfortably, the practitioner must adopt a very specific posture. Adjustable seats with armrests are available to reduce fatigue.
Ergonomics
A microscope can be quite bulky if it is not mounted on the ceiling or fixed to the wall.
Financial Investment
Acquiring an operating microscope represents a significant cost. It also requires modifying the workspace and obtaining specialized instruments.
Need for Adequately Trained Personnel
Generally, one assistant is needed to manage instrumentation and a second to handle photo and video tasks.
Practitioner’s Experience
The practitioner must have a certain level of expertise for the microscope to be used effectively. For all these reasons, microscope use is typically reserved for specialist dentists.
Limitations
Even the best magnification and lighting offered by the operating microscope are insufficient on their own. A solid understanding of dental anatomy and its variations is crucial for maximizing microscope efficiency. Indeed, new anatomical insights gleaned from Cone Beam or CBCT (Cone Beam Computed Tomography) have somewhat tempered the initial enthusiasm around operating microscopes.
Indications
The operating microscope is indicated in periodontics, in fixed prosthodontics (for crown preparation), but primarily in restorative dentistry and endodontics.
Restorative Dentistry
In restorative dentistry, the microscope can be used for both diagnostic and therapeutic purposes.
Starting at around 13x magnification, the microscope becomes especially valuable for clinical examinations, making it possible to diagnose very small lesions (caries, secondary caries, defective restorations, cracks, and fractures).
Furthermore, when combined with micro-instrumentation, the operating microscope allows for the creation of micro-cavities. It also improves the placement of materials by verifying the absence of gaps and eliminating any bubbles or voids in sealants.
Surgical and Non-Surgical Endodontics
Ideal endodontics occurs at the scale of tenths of a millimeter. Optical aids are extremely advantageous because they help meet the biological and mechanical requirements of canal preparation. The operating microscope indeed seems to fulfill all the necessary criteria.
Throughout every stage of endodontic treatment and retreatment—from diagnosis to the three-dimensional filling of the canal system—numerous clinical cases illustrate the benefits of the operating microscope:
- Diagnosis: In addition to a suspicious pinpoint probing, during access cavity preparation, the operating microscope can confirm the presence of a crack.
- Removing Posts: Gently removing a radicular post under microscopic vision can help limit excessive dentin destruction and may, in some instances, reveal a root perforation.
- External Resorption: Direct observation of external resorption under the microscope, which might look less extensive on an X-ray, can sometimes confirm the need for extraction.
Access Cavity Preparation
Typically, the initial outline of the access cavity is determined by projecting the pulp chamber roof onto the tooth’s occlusal surface, with occasional modifications to allow direct access to all canals.
Difficulties can arise, however, in cases of reduced pulp chamber volume or intracameral calcifications.
With the microscope, the practitioner can more clearly distinguish the chamber roof from the floor or detect calcifications that obstruct canal entrances, helping to avoid perforating the pulp chamber floor.
Right after exposing the pulp—even if the pulp is not retracted—the microscope, with its magnification and lighting, provides valuable information for creating a suitable access cavity. It reveals bleeding at the canal openings, calcifications or pulp stones, overhangs of secondary or reactive dentin, pulp tissue dissolved by the proteolytic action of sodium hypochlorite, and more.
Reading the “Dentin Map”
The microscope’s illumination helps distinguish the different shades of dentin so the practitioner can remove the affected dentin and better recognize the floor of the pulp chamber:
- White, chalky dentin outlines the pulpal floor.
- A pearly blue dentin surrounds the canal entrances.
- A brownish line of dentin links the canal orifices.
Finding and Relocating Canal Orifices
By aiding in the interpretation of the dentin map, the microscope helps locate the canal orifices.
It also facilitates applying symmetry laws. For example, in a mandibular molar with a single distal canal, that canal will lie along the brown line connecting the two mesial canals, forming a triangle. If one observes a distal canal that seems off-center, one must look for a second distal canal on the opposite side of the brown line, creating a rectangle of four canals.
In a maxillary premolar, an off-center canal orifice should prompt the practitioner to follow the brown line on the pulpal floor to find the second canal at its terminus.
Thanks to the microscope, practitioners frequently discover a second mesiobuccal canal (MB2) in the maxillary first molar (present in 52% to 96% of cases) or a second canal in a mandibular incisor.
Moreover, an external anatomical feature like an extra cusp should signal the need to search, under the microscope, for an additional canal.
When treating multi-rooted teeth, removing the dentinal overhang (often referred to as the “triangle of dentin”) at the junction between the floor and cavity walls is crucial, as the canal orifices emerge at an angle. Eliminating coronal curvature to ensure a straight path for rotary instruments down to the apex becomes safer and easier under the microscope.
Intra-Canal Obstacles
Removing pulp stones, separated instruments, or gutta-percha remnants from canal walls during retreatment—with the aid of specialized instruments—is significantly more efficient and safer when performed under magnification and illumination.
Quality of Canal Preparation and Three-Dimensional Obturation
Microscopic visualization aids in confirming the removal of the smear layer and pulpal/dentinal debris generated during endodontic treatment or retreatment.
Because of its magnification, the microscope also makes it possible to visually check the compaction of gutta-percha and the overall quality of the obturation—this is especially critical for difficult configurations like a C-shaped canal.
Conclusion: The Operating Microscope
The operating microscope greatly enhances visibility, making diagnosis easier and providing more ergonomic, comfortable, and higher-quality care for both practitioners and patients. It also helps preserve surrounding tissues by adhering to the principle of tissue conservation.
However, the operating microscope requires a substantial financial investment, a learning curve, and a very specific organization—where the assistants’ role becomes essential.
These factors explain why this piece of equipment is still relatively rare in general (omnipractice) dental offices, despite the tremendous advantages it provides.